How to Press a Fingerboard Deck With a Mold
Pressing a fingerboard deck means gluing thin wood veneer plies together and clamping them in a shaped mold so they cure into a curved, ready-to-shape blank. Most decks use 5 plies of veneer, wood glue, and a 12-24 hour cure time under even clamp pressure before the blank is cut, sanded, and sealed. Skipping cure time or clamping unevenly is the most common cause of a warped or weak-popping deck.
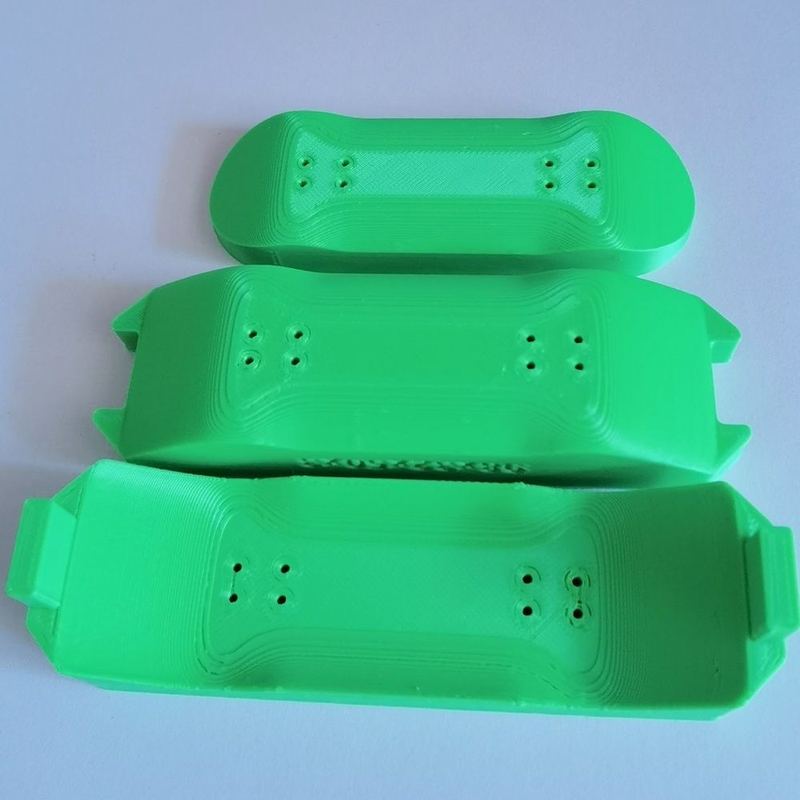
Fingerboard Press Mold 3-Piece Set with Scribe — Style A, 98×32mm
What You Need Before You Start
A pressed fingerboard deck starts as a flat stack of thin wood veneer, not a pre-shaped blank. You will need veneer sheets (maple is the standard choice for durability and pop), wood glue, a fingerboard mold with clamps or bolts, wax or baking paper to stop the blank sticking to the mold, sandpaper in a few grits, a fine saw or rotary tool, a small drill bit for truck holes, and a sealant or clear coat.
The mold is what gives the deck its concave and kick, so its quality directly affects the finished shape. A mold that flexes or does not clamp evenly will transfer that unevenness into every blank you press.
Step 1-2: Cut and Stack the Plies
Cut your veneer sheets slightly oversized compared to your final deck outline; extra material around the edges is easier to trim away later than to add back. Most fingerboard decks use 5 plies, which gives a strong, poppy blank without excessive thickness or weight.
Alternate the grain direction of each ply against the one below it, the same cross-grain lamination principle used in plywood and full-size skateboards. This is what keeps a thin deck from splitting or twisting once it is under the stress of flips and grinds.
Step 3-4: Glue and Clamp in the Mold
Apply a thin, even coat of wood glue between each ply. Too much glue slows curing and can push plies apart under clamp pressure; too little leaves dry spots that never bond. A thin, uniform, slightly glossy film across the surface is the sign you have the amount right.
Sandwich the glued stack between wax or baking paper, then seat it in the mold. Tighten the clamps or bolts gradually and evenly, alternating sides as you go, rather than cranking one side down fully first. Even pressure across the whole blank is what produces a symmetrical concave; uneven pressure produces a twisted or flat-sided deck.
Step 5: Cure Time
Leave the blank clamped in the mold for 12-24 hours. Twelve hours is a workable minimum, but a full 24-hour cure gives the glue more time to fully set and produces a stiffer, more consistent blank with better pop.
Cold rooms, thicker plies, or a heavier glue application can all extend the time needed. If a deck feels soft, spongy, or the concave relaxes noticeably after you unclamp it, the most likely cause is pulling it out of the mold too early.
Step 6-8: Cut, Sand, and Seal
Once cured, remove the blank and trace your outline using the mold impression or a template as a guide, marking a center line first so the nose and tail stay symmetrical. Rough-cut outside the line with a fine saw or rotary tool, then sand down to the final shape in stages, starting with a medium grit and finishing with a fine grit around 400-600.
Drill and countersink the truck holes so the mounting screws sit flush, then seal the deck with a clear coat or oil finish to protect the wood and give it a smooth, finished feel. Apply grip tape last, once the finish has fully dried, so the adhesive bonds to a clean surface.
Frequently asked questions
How many plies does a fingerboard deck need?+
Most fingerboard decks use 5 plies of veneer, which balances strength, weight, and pop. Some decks use additional plies for extra stiffness, but 5 remains the standard construction.
How long does a fingerboard deck need to cure in the mold?+
Plan for 12-24 hours of clamped cure time. Twelve hours is a practical minimum, but a full 24 hours produces a stiffer blank with more consistent pop.
What glue should I use to press a fingerboard deck?+
Wood glue is the standard adhesive for laminating veneer plies. Apply it in a thin, even coat; a light, glossy film across the surface is the visual sign you have used the right amount.
Why did my pressed fingerboard deck come out warped?+
Warping almost always comes from uneven clamp pressure or removing the blank from the mold before it has fully cured. Clamp evenly on both sides and let the glue set for the full recommended time.
What wood is best for a fingerboard deck?+
Maple veneer is the standard choice because it is strong, holds its shape well, and gives the deck a lively, poppy feel similar to a full-size skateboard.
Do I need a mold to press a fingerboard deck?+
You can clamp plies without a dedicated mold, but the concave and kick will be far harder to make consistent. A mold holds the correct curve and shape while the glue cures, which is what gives pressed decks their repeatable feel.
Ready to build?
Shop precision completes, decks, molds, and hardware from the Lab.